"errhmm.... You might want to put in a new kitchen...." the broker said, when he first showed us the house. Although brokers are usually not too happy pointing out necessary investments to a potential buyer, he just couldn't deny this one: the kitchen was indeed beyond hope.
Wait, would you like to see it?
 |
| hmpff... |
What you are looking at is a patchwork of everything: a small vintage kitchen with beside it some weird extra cabinet with a piece of weathered wood, and a gap next to it where our oven just didn't quite fit in. Oh, and did I mention the styrofoam ceiling, the range hood that didn't fit and the tiles with a color of moldy eggnog?
Something definitely needed to be done, but buying a new kitchen, as the broker suggested? no..... we have something much more fun in mind!
stage 1. Demolition
We cued the music, and began by doing what we do best.
 |
| Bye styrofoam ceiling! |
 |
| Byeeee paneled walls! (lot of painting to be done there..) |
 |
| "hey, where is my kitchen?" |
By Friday evening the place that used to be our kitchen looked like it was struck by war: there were pieces styrofoam everywhere, the former paneled walls looked battered, and where the kitchen counter used to stand was a gaping hole. But don't despair 'cause the fun has just started!
stage 2. painting the cabinets
The next morning my parents -being the uncredited heroes that they are- came by with a circular saw and a whole box of plumbing-tools that we could borrow. So while they trimmed our lawn and hedge (heroes, have I mentioned that they are heroes?) Joost started working on the plumbing and electricity, and I started on the kitchen cabinets.
 |
| wait... wasn't that old kitchen demolished? |
no, of course not: why waste a perfectly fine kitchen just because it's ugly? I had a plan..
 |
| PAINT! |
If you want to paint your kitchen ( if it's made from wood, that is) it kind of works like painting anything else, but just be a little more thorough with the preparation, so:
- so really take time to take all things apart ( and no, don't leave those door handles on, you lazy slacker!)
- clean the wood like your life depends on it, and
- sand it like there's no tomorrow.
- several thin layers of paint are better than one thick layer.
I mean, you really want to make sure the paint stays where it should be, don't you?
 |
| I see a red door and I want it painted black, no colors anymore I want them to turn black.. |
stage 3. handmade countertop
So, the first layer of paint was drying, and I don't like watching that, so I turned to making a countertop.
A while ago I had seen a picture of a countertop made from underlayment, and I thought that it looked pretty cool. Since our countertop is longer than standard measurements, which makes pre-fab countertops quite expensive, I decided: why not try to make one myself from underlayment? So, that's what I did!
 |
| An underlayment countertop...? I like! |
It was a lot of work and I didn't really take pictures, but if you would like to try it yourself, keep these things in mind:
- Buy good quality underlayment. The cheaper versions have a bigger chance of bending. Mine was some sort of Scandinavian underlayment.
- Be very precise with measuring, and if you are uncertain, be generous with your measurements, you can always take some wood of after the first fitting. But sawing off too much, and you're basically screwed.
- If you need to make joineries (as I did) be precice with them. Luckily, my underlayment came with pre-made joineries(but still, make sure water can't get in there)
- Add A LOT OF varnish. And add it to all sides of the countertop. Top, bottom, sides, the sides of the holes you cut for the sink, everything needs to be sealed with some layers of varnish.
stage 4. installing the kitchen
The next morning, we started building a platform for all the kitchen cabinets and machinery for our kitchen.
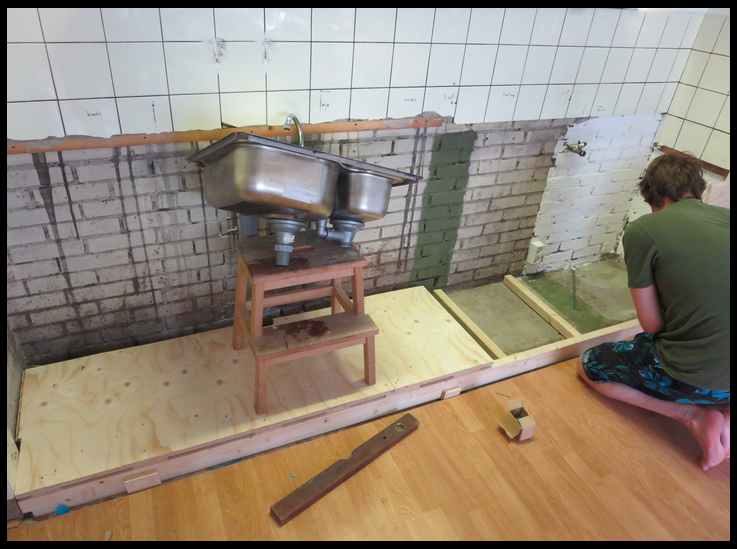 |
| platform building! |
If you want to remodel your own kitchen you might be lucky enough to skip this step, but since our kitchen cabinets were basically made for the tiniest amongst us, the oven cabinet for giants Dutch people, and the person who designed the dishwasher just threw standard measurements out of the window all together, I did a lot of math to make sure everything would end up to be the same height.
 |
| seems to fit.. |
 |
| Joost is contemplating the new kitchen |
when all cabinets were in place, we started with the frame for the countertop.

And "simply" placed the countertop on top of it, and made some final adjustments to it.
 |
| so buff |
 |
| and adding the sink. |
After wiggling a stubborn oven into place, we were finished for the weekend!
Here's the result so far!
 |
| it looks so big!! |
 |
| I love that wooden color ( and the second-hand sink, love that one too:) ) |

Not bad for a weekend of work, right?
Of course, there is still quite some work that needs to be done (adding some extra doors, some painting, etc) But how do you like it so far?
part 2 follows -hopefully- soon!

Seriously impressive transformation! I laughed about the cabinets being made for dwarves... we looked at a few houses with really short kitchens and I was like "the Dutch are a tall people! why are these cupboards made for stubby short people."
ReplyDeleteHi there, glad you like it!
DeleteAnd indeed, why on earth are all those kitchens so tiny? maybe mister Bruynzeel -the pater familias of Dutch kitchens- was very short and unaware that the rest of the Netherlands was taller? ;)
Underlayment? No idea what that is - I don't think it's even a word! It looks like plyboard, and looks pretty fricking cool! Well done :-)
ReplyDeleteunderlayment is the type of hardwood plywood that is used to underlay floors, hence the term. Might be the case that the nickname is more common in the Netherlands than in other countries, but the term is not that unusual ;) and yep, it's basically plywood boarding, but quite thick and strong :)
DeleteGlad you like it!
It looks great so far. Clever use of cheaper materials too, I too haven't heard of underlayment but I think it's layers of plywood stuck together to make them strong, love that you used it to make a wooden worktop Karen
ReplyDeleteOh my goodness, it is GORGEOUS!! What an amazing transformation! Wow!!!!
ReplyDelete