 |
Naturally, things haven't been great here, and last week was pretty tough to say the least, but a very busy week at work kept my thoughts a bit diverted, and well.. we'll manage :)
So, now on to more positive things: as I have a hour between work and, wel.. more work, I thought it would be nice to give you a little update on the kitchen!
let's take a little step back, and see what we started with, okay?
 |
| It makes me giggle.. |
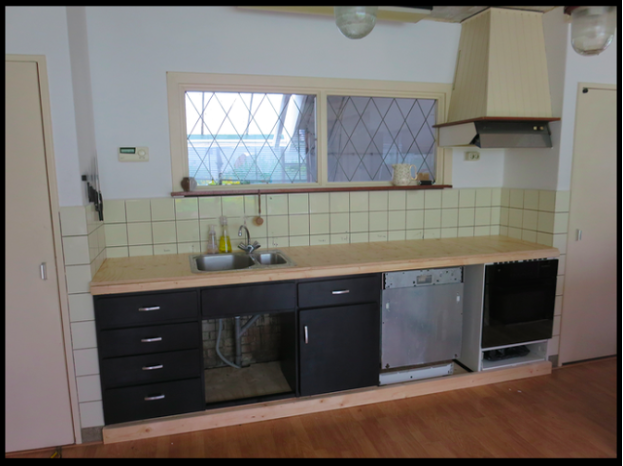 |
| Quite an impressive transformation already, but we're far from finished! |
Stage 5. Adding fronts.
First of all, with those gaping holes, it looked like our kitchen was missing a few teeth. So, I made extra drawer and cabinet fronts made from leftover pieces of underlayment (that sturdy, plywood boarding I talked about earlier;) )
 |
| As you can see, I ALWAYS remain professional during home-improvement sessions. |
 |
| installing... |
 |
| voila! |
I then painted all the new doors black to match the rest of the kitchen.
stage 6. painting the tiles.
Next up were the
 |
| be gone, ugly yellow tiles! |
I used a primer and paint designed for painting tiles, and combined the job with painting the tiles in the bathroom, and restoring the bathtub to make more efficient use of the paint (it's a 2-component kind of paint, so you can't store it for later usage). more on those two projects follow later!
stage 7. and some more painting
On Friday, when my parents called that they would be visiting the next day with my grandmother, we decided to paint the rest of the woodwork in the kitchen, so that at least one of the parts in our home would look kind of finished. We were a bit in a hurry, so I forgot to take pictures but well.. you know the process, some sanding, some cleaning some painting, and a lot of cleaning myself before the family arrived ;)
the "finished" kitchen!
So guys, here's our new kitchen! I'm pretty stoked with the result!
Of course, some things still need to be done: there is a little space between dishwasher and oven that needs a little front ( or tiny drawer..), the ceiling is still quite ugly, and I still want to modify our clunky range hood. But well, a kitchen isn't build in a day!
here's what it looks like:

 |
| you can still see the pattern of the wood shining through the paint, you could get rid of that by adding extra paint, but we quite liked it, as it makes that the kitchen doesn't look too shiny and modern. |
 |
| The color-scheme matches the little house warming gifts we received from our girls next door. |
|
| the kitchen table completes the look (also: can't have enough basil!) |
 |
| one of my favorite parts is our spice drawer, it feels like an old fashioned shop! |
 |
| the jars are second hand jars from an old spice-rack, that got a more modern look with a new label (I simply made them on the computer, the font is 'impact label reversed') |
 |
| I made the cutting boards by sawing regular cutting boards into the shape of a house. |
 |
| In the corner stands a silent witness of Joost's impulsive shopping behavior: a kilo (!) of peppermint |
 |
| the window that looks into the garage is one of the quirky parts of this house: it was build because the previous lady of the house liked to watch her husband when he was working in the garage. |
 |
| the built-ins have plenty of space for all my groceries, which I stored in old fashioned jars (labels are home-made, font is again impact label reversed). |
If you're anything like me, you'll love things even more when they are cheap (I'm such a frugal girl), here's what we paid for the kitchen!
| refrigerator (2nd hand) | 150 |
| dishwasher (2nd hand) | 150 |
| kitchen sink (2nd hand) | 25 |
| oven cabinet (ikea) | 75 |
| wood | 110 |
| paint and varnish | 50 |
| water/electricity installation | 120 |
| total | 680 |
A quick comparison on a kitchen supplier site showed that a comparable kitchen would have cost us at least 9000 euro's, and I have to say that the kitchens that you get for that money aren't even that pretty. so pretty good save, hmm?
so, do you like it? I'm looking forward to your reactions and feedback! :)

I feel like if you aren't laying on the floor at some point in your home improvement projects, you aren't doing it right ;)
ReplyDeleteYour kitchen looks marvelous! Even though it has been a sad time, you must be thrilled with the way it turned out.
Amazing! I just picked raspberries at a friends house. I your kitchen is so lovely I wish I was there to make pies.
ReplyDeleteY'alls house is coming together beautifully! Both of you are so talented. I don't have any home improvement experience such as making cabinets, painting tiles or using drills etc., I admire you so much for having these skills!
ReplyDeleteSending you hugs and prayers of comfort on the loss of your sweet kitty.
I look forward to all of your blog posts.
Hugs,
Tambra
Oh my gosh it looks so great! You guys should be so proud of yourselves. I love the grain of the wood peeking through the black paint.
ReplyDelete